Monday, April 30, 2007

Quilting frames and supplies


With Mother's day fast approaching don't you deserve some new craft supplies or maybe a new quilting frame or even a new sewing machine? A quality craft person is only as good as their tools. Isn't this the truth?
Whilst cutting with a very blunt rotary cutter the other day I realized that a new blade was in order. And then I took a look at my cutting mat and realized that it is starting to look very worn out. No wonder my cutting has not been as accurate lately?!!!!
I really am low on threads and my needles are all blunt. I can never find my sewing scissors and I need a new sewing light. Just as well I know of somewhere that has great bargains for all we sewing Mums. If my story sounds familiar then click here for some new sewing supplies.


Happy stitching and I hope you get some new supplies for Mother's Day!
Lenna


Sunday, April 29, 2007

Stitching fly stitch


Fly stitch is an easy embroidery stitch to master. It's also known as Y stitch and open loop stitch.This stitch can be worked quickly. I use it regularly when embroidering plants and bushes.It works well to enclose a flower bud or as branches of foliage. Extended fly stitch is where you lengthen or extend the base of the stitch to form an elongated Y. This is the stitch I use most often for working a rose or daisy bush. The stitch can be varied in length and overlapped to produce great results quickly and easily. For a sample of how this stitch can be used in an embroidered project click here.


Fly stitch can also be stitched in a horizontal or vertical row. The stitches can touch or be spaced regularly apart. Fly stitch is best worked in a taut embroidery hoop.


Bring the needle through at the top left and insert it diagonally back into the fabric from the right. The needle tip should point downwards.Pull the needle through over the thread to form a v shape. Work a straight stitch to hold the loop in place. A short straight stitch represents a Fly stitch and a longer straight stitch represents an extended Fly stitch.
Fly stitch is a wonderful stitch to have in your embroidery repertoire.
Happy stitching.
Warmly Lenna
www.stitchingcow.com

Thursday, April 26, 2007

Free hand applique designs

I just love hand applique. It's a fantastic technique for decorating quilts, wall hangings, clothing or children's items. I remember making fabric back packs one Christmas for my three children. Each back pack was hand appliqued and personalized for each child. The kids adored them. They would proudly grab their backpacks when having a sleep over with their Grandparents. And even though they are now older and have outgrown them, they still have them tucked away in their bedrooms.
Making a child's pre school bag or library bag can also be a fun thing to do with applique. Although finding a suitable applique pattern can sometimes be difficult. The team at Stitching Cow are in the process of putting together some brand new designs just perfect for your applique needs. They should be ready soon so keep a look out on the website: http://www.stitchingcow.com/
For some free hand applique designs perfect for children simply click here
Hope you and the kids enjoy them.
Happy appliqueing!
Lenna

Wednesday, April 25, 2007

Little Green Cottage Patterns


Little Green Cottage patterns can now be found at http://www.stitchingcow.com/


If you are looking for hand embroidered, or hand appliquéd projects you much check out the range of patterns available at Stitching Cow. There's something for everyone whether you are a beginner or more experienced sewing enthusiast. Some of the patterns include sewing bags, embroidered needle cases and novelty pin cushions, cloth dolls, quilts, wall hangings, and even Santa himself with a patchwork sack.


The website showcases a large colour photo of each design and a description of the techniques covered. You also have the option of purchasing the pattern in an e or electronic format. This means that you can now get your pattern and start stitching it sooner than ever before. The pattern is sent to you immediately so that you can download it to your computer. No more waiting at the mail box.This wonderful new technology means that you can have your own copy of these patterns for half the normal price. It's like getting two for the price of one.
Shouldn't you take advantage of this technology today? Take a look at this original range of Little Green Cottage patterns, you'll be amazed. Click here to start enjoying Little Green Cottage patterns today

Monday, April 23, 2007

Teen embroidery designs

My 14 year old daughter has always enjoyed sewing and embroidery. As a result I have always been on the look out for "teen embroidery designs". Designs and patterns that would appeal to a teenager. This has not been an easy task. Often we would sift through more traditional designs and she would sign and say "not quite what I'm looking for mum". She was after something that was quick and easy yet useful or decorative for her bedroom.
As a result of our searching I started to draw designs for her and now I'm proud to say that she has started designing her own creations as well. This prompted us to include a section on our Stitching Cow website for kids or teens. We are currently in the process of putting some new designs together.Click here for some kids sewing patterns.

Happy stitching
Lenna

Sunday, April 22, 2007

How to sew together quilt batting

Have you ever been in the situation where your quilt is too large for your batting?

Or perhaps you have some batting offcuts that could be used for your next quilt project if only you knew how to join together the batting.

Here is the information that you need.

The good news is that joining together quilt batting is very easy. It can be done by hand or machine. If you choose to join by hand (my recommendation) you will need a large needle and a neutral coloured machine cotton. Simply secure the thread at the top of the two pieces to be joined and sew a ladder stitch. To work a ladder stitch weave the thread back and forth catching the batting on the raw edges. (refer to diagram below) The batting should not be overlapped. It should just come together as shown in the diagram.


You can also join the batting by using a walking foot. Select the largest setting you have for zig- zag stitch and sew the batting together. As for the hand technique - do not overlap the batting.

Hand Technique Machine technique

Hope this has solved your batting problems.
If not you can pick up a bargain on quilt fabrics and batting here

Happy quilting
Lenna

Sunday, April 15, 2007

How to iron quilt fabric


Cotton quilting fabric should always be ironed with a hot, steamed iron before cutting. You should always unfold the fabric and iron in a single layer. Ironing your quilting fabric in a folded position can cause cutting problems. It is far better to iron your fabric well and then refold (do not press ). The selvages should be even and the fold at the bottom should not be buckled. You should hold your quilting fabric up rather then do this on a flat surface. If the bottom edge is not hanging straight, move one of the selvages in the opposite direction until the folded edge straightens. Sometimes quilting fabric is folded onto the bolt unevenly. If you do not fold your quilting fabric in this manner you can get a bow happening in your cut lengths. This becomes more of a problem if you are cutting border strips.

Once you are satisfied that the folded edge is straight, place your fabric down on a flat surface and take the folded edge and line it up evenly with the selvages. You now have 4 layers of fabric ready to cut. You need to trim the cutting edge before measuring. This is why it is always wise to purchase a little more fabric than you require.
Happy stitching
Lenna

Saturday, April 14, 2007

Need more fabric for a quilt?


As a fellow patchworker and quilter I understand all too well the anxiety involved with running short of fabric. Searching high and low for the right fabric can be difficult. Although that's all about to change with more and more fabric retailers advertising online. The Internet has connected the quilting community in an amazing way. It is now possible to locate whatever style of quilting fabric that you are looking for. Most sites include colour pictures of the fabrics on offer and will list the fabric according to manufacturer eg Moda or category eg florals. What a wonderful resource for anxious quilters who have just discovered they are 20cm short of quilting fabric for their newest quilt. The only slight disadvantage is the wait for the postman to arrive!


Hope you locate what you are looking for.


Happy quilting!

Warmly Lenna

What is stitching in the ditch?

Stitching in the ditch is a quilting term. It is a machine quilting technique that involves quilting in the seam line. This is commonly done with invisible thread (a little bit like fine fishing line), or you can use matching thread. This technique is usually chosen by quilters who do not like to see the quilting stitch. Because the stitch is "in the ditch of the seam line" it tends to disappear.
This technique can be difficult to master and miscalculating the seam can look unsightly. So care needs to be taken.

Stitching in the ditch is not often chosen by hand quilters. A more popular technique is to quilt 1/4" from the seam line which avoids extra bulk of the seam allowance. If you would like to hand quilt using the stitch in the ditch technique you can do so by quilting with a small running stitch. Do not use a back stitch.

Happy quilting.
Lenna

Thursday, April 12, 2007

Beginner Hand Embroidery Pattern With Stick People


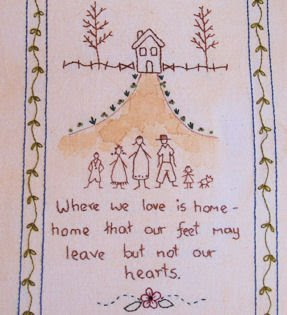
If you are new to hand embroidery or if you are searching for an embroidery pattern with stick people, here's a project for you. This cute little pattern is very quick and easy. It incorporates simple beginner embroidery stitches such as back stitch and lazy daisy stitch. It could be framed (as shown) or incorporated into a cushion or quilt design.

If you would like some more information about how this design could be yours click here.

Tuesday, April 10, 2007

Crewel Embroidery - What is it?

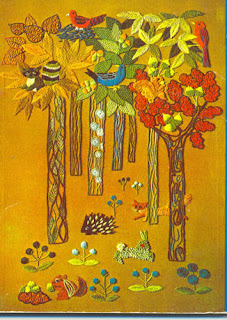
Crewel work is embroidery on practically any fabric in wool. It was traditionally worked in a two ply variety known as "crewel" which really gives the needlework its name.
Crewel embroidery was commonly worked for bed spreads, valances and curtains for four poster beds, wall hangings, pockets (two of which would be tied under the waist, underneath a dress) and petticoats. Crewel embroidery reached its peak in 17th century England and 18th century America.

Crewel embroidery is also distinctive because of the stylized shapes and motives used. Many crewel worked designs typically feature trees, fruit, flowers, birds and dragonflies. Shapes are usually filled with a variety of stitches to represent solid blocks of colour. Some common stitches used include Chain stitch, Roumanian stitch, Stem stitch (sometimes referred to as crewel stitch), Split stitch, Block Shading, Long and Short stitch, and Laid work. Although crewel embroidery is certainly not limited to these.

Needles should be medium length with long eyes. These are available at most craft stores and come in a variety of sizes. They will be labelled crewel or embroidery needles.

I have included some samples of crewel embroidery. They have been taken from "The Craft of Crewel Embroidery" by Erica Wilson

If you enjoy hand embroidery click here for some original designs.


Sunday, April 8, 2007

How to Make Embroidery Satin Stitch


Satin stitch is a flat stitch which looks easy to work, but practice is needed for it to be sewn neatly. The stitches are worked very closely together and can be embroidered in any direction. For best results work satin stitch in an embroidery hoop or frame. This will enable the stitches to be worked evenly and prevent puckering.


To work satin stitch embroidery carry the thread across the shape to be filled, then return it underneath the fabric close to the point where it emerged. Work the stitches closely together so that they form an edge around the shape.


Satin stitch can be of any length although longer stitches tend to become loose and untidy and are easily snagged. Therefore it is best to work larger shapes in rows of satin stitch.


Satin stitch can be embroidered in one movement as shown in the diagram, although I prefer to stab the stitch up and down. I find this gives me a better result. The other trick I can suggest, especially for beginners, is to work a back stitch around the outline of the shape first and then satin stitch the area to be filled. This gives the edge of the shape a sharp look and prevents any uneven stitches showing the fabric underneath.Try this technique if you have had trouble working this stitch in the past.


Satin stitch is a wonderful stitch for monogramming items. I have personalized a sewing pouch using tight rows of backstitch to fill the letters although this could easily be adapted and worked in satin stitch to give a similar effect. Click here to see this design. This pattern also includes a satin stitch alphabet.


Using different stitch lengths and blending different thread colours can add a whole new dimension to your satin stitch embroidery work.

It's worth practicing satin stitch and experimenting with its applications. It's a great stitch to have in your embroidery repertoire.
Click here to discover more information about how to embroider


Happy stitching!

Lenna


Thursday, April 5, 2007

Quilt Postcard Mail Greetings

I've just come across a product that quilters will go crazy about.
Introducing Quilt Postcard Mail Greetings
"Now imagine how pleased your family and friends will be to receive a Quilt Mail Greeting with your favorite family picture and a custom printed greeting.
What could be better? That they are quick and easy?
The truth is it takes less time to make three of these little greeting cards than it takes to write the family Christmas poem! And it costs less, too. Especially since you can use fabric scraps.
Because I was so excited when I finished the Quilt Mail Greetings, I called my friend, Sue. She wanted to know exactly how to make them – step by step. Thing is, most patterns and instructions for these fabulous little quilt postcard treasures are about the same as for many quilting patterns – one page; a few one line instructions; a couple of measurements; basically, figure it out yourself.
Frankly, those instructions leave a lot to be desired. Especially if you are new to quilting or transferring photos onto fabric.
Using the “figure it out yourself” method can cost a bunch of time, money and fabric – let alone stress. And everyone knows, additional stress is the last thing we need this time of year.
Introducing the definitive, 52 page step-by-step guide for making Quilt Mail Greetings. Sue and I spend hours putting this resource together: researching various methods of transferring photographs to fabric, taking pictures of every step of the way, and writing each instruction as clear as a bell, guaranteeing your success."

Click on the link to find out how to make your family holiday greeting so memorable that your family and friends will be talking about it (and your talent) for years.
Read more about this terrific product click here

Warmly Lenna

What is an embroidery box separater?


If your passion is hand embroidery then you will need a good system for storing your embroidery threads or floss. Setting this up from the start can save you a lot of time later on.


I remember teaching an embroidery class one day and having one of the ladies in the class share her embroidery stash with us. She rumaged around under the table in her sewing basket and then presented her threads with a giggle. As soon as the class sighted her pile the room errupted in laughs as well. The mass of threads reminded me of a large matted football. (If this sounds familiar then keep reading)


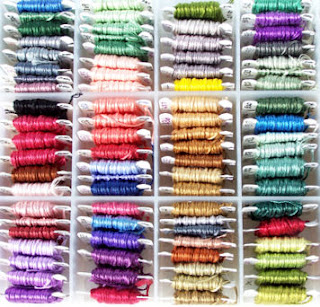
What she was in need of was an embroidery or floss box. These can be found in all good craft shops and are quite inexpensive. These plastic boxes are designed so that your embroidery threads can be separated into colour ways eg. blues, greens,browns ect. They come with plastic or cardboard bobbins that are designed to wind your hanks of thread onto. It is also advisable to record on the bobbin the brand of thread eg DMC and the number of the thread colour. This is a must. More than once I have been caught half way through a project and run out of thread. This can be a disaster and easily avoided if you have the colour number to refer to. Believe me it can be very difficult to match a colour with a 5cm off cut of embroidery thread.


Embroidery thread boxes are a good investment. Not only do they keep your embroidery threads organized in a neat and tidy fashion, they also protect your threads from dust and light.


So if you have a matted pile of threads in your sewing basket, make the decision today to give them a proper home.


Click on the link for some storage ideas or to purchase your own embroidery thread box, you'll be glad that you did. Here's the link
PS to save time go to the embroidery section and type into the search box "floss storage box" then "plastic storage organizers"

Happy stitching


Warmly Lenna

Monday, April 2, 2007

Latest Technology in Clothing and Quilting Sewing Machines


Is it time for a new sewing machine?
Are you looking for the best buy for sewing machines?
Look no further.I've just been sent the scoop on a sale that is happening right now and you could be the one who benefits from it.

If your sewing machine is looking a bit sad or no longer does what you want it too, then take a look at the latest sewing machines on offer from Singer.

Click on the link to discover how you could take advantage of some fabulous deals on the latest technology sewing machines, and you even get FREE shipping.
Happy Stitching
Lenna


Quilt Book Possibilities

I adore well written informative and inspirational quilting books. Haveing a range of resource books at your fingertips is invaluable. Whether you need inspiration for a new project or you need to brush up on a quilting technique or embroidery stitch, your home library is there to help you. It's no wonder that I'm always on the look out to add to my collection.
Whilst looking for something new online at Amozon I came across a few books that could be of use to you as well. What's really great about Amazon is that they now give potential buyers access to testimonials that other like minded people have posted on their site. This saves heaps of time and helps minimize the purchase of a book that's not really suited to your needs.
Here's a sample of what I mean, here are some comments about a quilting book for beginners:

"I had always wanted to learn quilting but had never had a chance - no courses in my area, etc. Then I ordered this book and it did magic: it removed my fears and made me feel that, though quilting does involve work, that work can be pleasant and fun. "

"Search no more! I am in the process of taking a quilting class and this is the required reading. I could actually learn to quilt straight from the book, no instructor necessary"

Click on the link for more information and to read other testimonials about this quilting book http://www.stitchingcow.com/patchwork-books.htm

Happy stitching Lenna

ShareThis

LinkWithin

Related Posts with Thumbnails